
you shouldn’t read this yet lol, it’s still very WIP
Timing: Lining up the words of the script with the words of the audio, preferably in a way that looks good and is easy to read.
Before you do anything else, you’ll need to get a video, and a script. The easiest way is to grab some random release off the cat site, extract the subs, and set all the timestamps to 00:00.00.
You’ll also need Aegisub, if you don’t already have it. No, you can’t use something else.
If you spot something wrong with any part of this guide, feel free to yell at me on discord.
Next, generate keyframes. These are very important if you want your timing to look good, which I assume you do.
Your video will have keyframes already in it, and they might be decent enough, but they might also be completely useless. You’ll almost certainly have to generate your own at some point, so get learning how to do it out of the way now. They’ll probably be better anyway.
If you’re on windows, use this batch script [7z], which has everything you need bundled in. Drag and drop your video onto it, and wait.
Anywhere else, you’ll have to do a bit of setup first. You’ll need a copy of FFMPEG (almost certainly in your package manager on linux), and scxvid-standalone, which you’ll have to compile. Don’t worry, it’s pretty painless. TODO: finish this paragraph
Both of these methods should produce a file ending in _keyframes.log.
Right, now you can open up Aegisub. I assume you can figure out how to open your script.
Load your video in with Video > Open Video..., or by dragging it onto the subtitle grid. Load your keyframes in much the same way (but with Open keyframes, obviously). The change will be much less obvious, but, assuming all went well, you should see the little lines beneath the video change.
Now, the first thing you’ll want to do is get rid of that video you just loaded. We don’t need it, at least not yet. All we care about for now is the audio, the keyframes, and the script.

If what you’re seeing now looks anything like the above, you should change it. Press  .
.

Now it should look like this. This is called a spectrogram, and it’s a way of representing sound in an image. Higher up means higher pitch, brighter means louder. It may look confusing, and might take a little while to get used to, but I promise you it’s worth it. With practice, you can pick out actual voices from most other background sounds, which you just can’t do on a waveform (because it only represents volume).
Also, turn on auto-commit. I have no idea why anyone would ever have it off.
Okay, now we’re ready to actually start timing something.
Go to the first line of dialogue, and set the start and end times to exactly where (you think) the line starts and ends. Left click for the start, right click for the end, or just click and drag. Check you got it right by playing the entire line, and/or by using the 500ms before/after buttons (
 ) to make sure there’s not anything you might have missed. You should hotkey these.
This is called rough timing. Don’t worry about being millisecond-accurate (it’s only rough, after all), but do try and get it close.
Rinse, move on to the next line, and repeat.
There are a few edge cases you might run into.
Probably most likely is two people talking at the same time.
The easiest way to deal with this is by putting each speaker’s lines into their own “block”, where all of their lines come one after the other in the grid, regardless of the order of the whole conversation.

If one of the speakers is less important, like an announcement in a train station (versus an actual conversation), add {\an8} to the start of their lines to move them to the top of the screen.
If they’re both equally important, add an overlap style (your normal dialogue style, but a bit different - usually a bit of (dark) colour on the border) to whichever one started speaking last.
If it’s only a little bit of overlap at the start and end, just leave it. We’ll get to that in a bit.
When you’re all done, the script should look something like this.

Now we move on to fine timing, where we make the subs comfortable to read.
First, add a little buffer at the start of every line. ~100ms should do. This is called lead-in, and it gives the brain time to catch up to the fact that a new line has appeared.
Next, add another buffer at the end. This one should be longer, ~400 or 500 ms should be okay. This is called lead-out.
If it’s still too short, make sure you haven’t missed any speech that should be part of the line. If you’re sure you haven’t missed anything, try extending the lead-out a little. If all else fails, speak to your editor and ask them to make the line shorter.
If you’re not sure if the line is long enough, look down to the subtitle grid, at the column labelled CPS (characters per second). Higher is worse. If it’s actually a problem, the table cell will go red. You can probably get away with this, you’re pushing it a bit with this, should probably fix this, and you should never have this. If there’s nothing there, you’re either typesetting, or you’re doing something very wrong.
Don’t worry if any of this causes overlaps. We’ll get to that in a bit.
You should always add lead-in and lead-out to every line you time. It makes lines much more readable. There are buttons for it under the spectrum ( ), but you should really hotkey them instead. That goes for every “button” I talk about, by the way. Don’t move the mouse down, click, move back up again, etc. Just press a key. Trust me, it’ll save you hours (maybe even days if you do enough).
There will probably be short gaps, or “flickers” between the lines.
Here’s an extreme example. It’s the same line of dialogue, so in this case it does, literally, flicker.
Here’s what that looks like in the spectrum.

Most flickers you encounter won’t be that bad, because you’ve (hopefully) rough timed it properly to begin with.
Here’s a less extreme example.
And what that looks like in the spectrum.

Make lines continuous (change end). A quicker way is to hotkey this script.
You might also have the lead-in of one line overlapping with the lead-out of the previous line. This can be fixed in largely the same way as the gaps seen previously. Lead-out of the last line to lead in of the current, etc.
This is called line linking.
If the actual speech overlaps, it’s probably best to just leave it. Time it as best you can, and differentiate it from the other line. Common ways to do this are with an overlap style (your normal dialogue style, but a bit different - usually a bit of (dark) colour on the border), or with \an8.
If it’s just one long sound, you may be able to take some liberties and just ignore the section of the line that’s not convenient to you (as long as the line’s gone on long enough).
TODO: example.
You’ll probably have some lines that start/end pretty close to a scene change, but not on it.
When the end time overshoots a keyframe by a little bit, it’s called a scene bleed (because the line “bleeds” into the next scene), and it looks crap. You should do your best to avoid them.

Remember those keyframes we generated earlier? This is where they come in handy.
You should see little pink lines in the spectrum, probably close to or around the start/end of the line. These are your keyframes, and they mark scene changes in the video.
Set the start/end to the pink line. The start/end marker should “snap” onto it. Thus, this is called snapping to keyframes.

There are different thresholds for when you should snap, depending on how far away the keyframe is, and whether it’s near the start or end. As a general rule, you should snap the start when the keyframe is within ~200/300ms. Any further, and you’ll have too much lead-in - the dialogue will show up ages before the actual speech starts.
The end is more forgiving. You should snap when the keyframe is within ~half a second in either direction.

If you get a line where the speech overruns the keyframe by a little bit, you should still snap. As long as it’s only a short syllable (maybe two if you’re pushing it), no one will really notice, and it’ll look much better.
If it wasn’t clear, you have to do all of that, in order, every time, for every line. This is not negotiable.
Now, you’re probably thinking that that’s a massive pain in the arse, and wishing that there was a way you could just not do it, but still end up with good subs. Fortunately, you’re in luck.
There are two, maybe three, ways to do fine timing automatically.
The first, and most common, is the Timing Post-Processor.
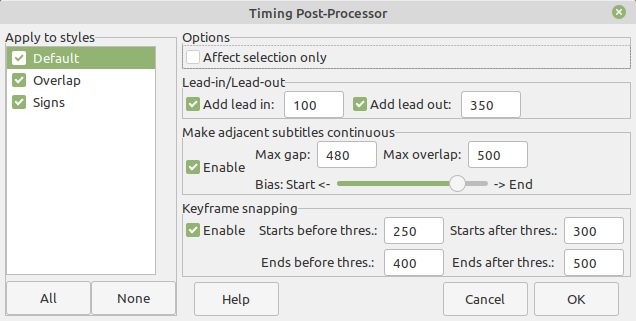
This should be relatively self-explanatory, so I’ll only go through it briefly.
It adds the specified lead-in/out, links the lines if there’s a gap or an overlap, and snaps to keyframes. Basically, it does everything except rough timing for you.
Now you’re probably thinking, “wtf why did you just go through all of that when I could just have the computer do it for me?”.
TODO: Why TPP bad
TODO: Phos Timing assistant