Shepherd's Cube
If you cannot solve a standard cube using the final layer solution
Edges then Corners then this is
not the page for you.
 |
|
Shepherd's cube is the ultimate
orientation cube. The original design by Alistair Shepherd
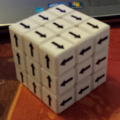
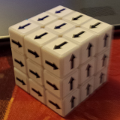
displayed hearts not arrows. The two images on the left display
the pattern for the arrows on a Shepherd's cube. You will
notice that I have photographed the cube from diagonally opposite
perspectives, purposely displaying the only two corners that the
three arrows point out of the cube. The other corners
have varying patters of one arrow pointing out and two arrows pointing in. The arrows on
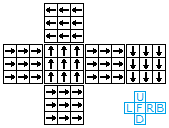
the opposite faces of the cube point in opposite directions. i.e. if the
front face arrows point up the back face arrows point down, if the
top face arrows point left then the bottom face arrows point right,
if the left face arrows point toward you the right face arrows point
away from you.
It is important to know that the two corners I have chosen to display here,
in the
top image have the arrows cycling clockwise and in the bottom image cycling
anti-clockwise, but even more importantly, if you rotate them in
place they are always oriented the same way because all three arrows
point out. Because of this they are referred to as sameys.
|
 |
The only Shepherd's cubes I have found for sale have been second
hand cubes, so basically this means you will probably have to make your own.
So you will need to buy a reasonably good quality cube and a set of stickers, available from
Cubesmith
and Oliver's.
 |
The arrows on opposite faces point in opposite directions.Front
face up, back face down, top face left, bottom face right, left face
toward you, right face away from you. |
The solution
For me the solution starts with one samey corner and finishes with the other
samey
corner.
Find one of the samey corners and use it on the top layer as a guide to
setting the orientation of the up face and side face centres. Now make
your cross. Put the other three corners in place and solve your
equator layer. Solving these first two layers is pretty much intuitive
and should not present you with to much of a problem.
The Final Layer
The final layer is a little more difficult but nothing that cannot be
overcome by following a few simple guidelines.
The Cross
 |
|
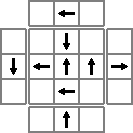
To make the cross on the final layer check your edge's side faces
and make sure that you have an up arrow, a down arrow and two
side on arrows pointing in the direction of the side on arrows on
the solved layers. If you do not have an up, down and two side on
arrows on the side faces then you will need to flip two of them for
instance if you have two up and two side on flip one of the up
arrows and a side on arrow that will present a down arrow on the
side when flipped (eg. the top edge in the image to the left).
If you have one of the side on arrows pointing in the wrong
direction then replace it with the matching edge on the equator
layer.
Once you have your up, down and two side on arrows rotate them to
form the cross |
 |
There are several possible orientations that can occur:
| One edge disoriented |
Two edges disoriented |
|
|
|
| When you find one edge disoriented you have not done
the previous step correctly. You will need to replace the
disoriented edge with the matching edge on the equator layer.
To make the cross reposition the edges again. |
When you have two disoriented edges you will need to
flip two of the edges (i.e. Say the down arrow and the side on arrow
that will provide a down arrow when flipped) and reposition the
edges again. |
Where the centre is 180 degrees out, you can use the solution in, "Step 2.
Positioning the Edges", on the
Edges then Corners page or either of the 180 degree centre rotation
algorithms on the Rotating Centres
page.
The Corners
Once you have the cross correct it is time to attack the corners. The
easiest way to do this is to position the samey corner first then if necessary rotate the other
three corners until the corner belonging diagonally opposite is in place. The
reason for doing this is that the other two corners will orient correctly in
each others positions.
Now orient the corners that need orienting. In the event all the corners are oriented
correctly but the first two layers have not reset simply move the
samey corner into position and reorient it until the first two layers have reset.
Finally rotate the final layer to the correct position.
This job is done.

